
 [German article]On 29. February Microsoft released Windows 8 Consumer Preview for public tests. Unfortunately my investigations showed, that the Portable Workspace Creator still wasn't on board. So a "Windows To Go" on a USB thumb drive or USB hard disc isn't supported. But I managed it again, to create a portable Windows 8 CP on a USB 2.0 hard disk.
What we need
To create an To Go installation of Windows 8 Consumer Preview an a USB media, we need:
- An external USB 2.0/3.0 hard disc as a Windows 8 install media. I don't recommend a USB thumb drive, because my experiences with Win 8 Developer Preview as Windows To Go was rather bad.
- Also a running Windows 8 installation is mandatory, because the steps drawn below are executed in a Windows 8 environment.
- We need also a Windows 8 Consumer Preview Setup-DVD (32 or 64 Bit).
- The programm imagex.exe is required to copy Windows install files to the USB media. I used the version from Windows Automated Installation Kit (for Windows 7). But it should be possible to use the file from Windows Assessement and Deployment Kit (ADK) for Windows 8 Consumer Preview. I've copied the file imagex.exe from the WAIK Tools folder to my Windows 8 user folder (take care to use imagex.exe in a version that fits with 32 or 64 bit windows).
We need also a bit spare time to proceed all steps. I used 20 minutes, to add Windows 8 CP (32 Bit) as a To Go install to a USB 2.0 hard disk already containing a Dual-Boot install of Windows 8 Developer Preview 32- and 64-Bit-version.
Disk partitioning
Here and here I've discussed, how to use Windows 8 Developer Preview to create a Windows 8 To Go installation on a USB disk drive. This approach may also be used with Windows 8 Consumer Preview. Instead of a USB thumb drive I used a USB 2.0 hard disk already containing Win 8 DP as 32 and 64 bit. I just added a new 40 GB logical volume on an extended partition to be used for the new installation.
It's possible to create a partition using diskpart in command prompt window (as diskussed here). But it is more comfortable to use computer management and it's included disk management feature, to do that job. Just press Windows+F keys and search in metro start screen for computer management.
The select computer management in left pane and go to the data volume of the USB drive shown in the lower right pane.

Disk management with my USB disk (German edition of Computer Management tool)
Windows disk management provides a comfortable way, to create and modify partitions, using context menu entries. Take care to have at least an active boot partition (system partition) containing the start files – otherwise the system won't boot. It's not mandatory (I guess) to use a separate 350 MByte start partition "System reserved". The screen shot shown above shows three primary partitions and one extended partition.
The first two partitions was created a while ago, using the Portable Workspace Creator from an early Windows 8 Build. If you start from scratch, you don't need a 350 MB partition. The two other primary partitions shown above, contains Windows 8 To Go 32 and 64 bit Developer Preview Build. Because I intended to keep this installs, I created a logical volume of 40 GB size on the extended partition. Then I formatted it with NTFS and set the volume label to Win832CP. After creating the partition, computer management may be closed.
Copy Windows 8 To Go install files
Now it's time to copy the Windows 8 CP install files to the target disk. I already discussed the steps here. The steps shown below are a bit different, because we already created a logical disk.
- Boot a System with Windows 8 Consumer Preview (CP) and assure, that the USB 2.0 disk is accessible.
- Insert your Windows 8 CP install DVD to a DVD drive und assure, that the media is readable.
- Check, if the file imagex.exe is located in a local folder of your Windows 8 disk.
- Open Windows Explorer und check the drive letters assigned to the DVD drive with your install DVD and note it.
- Check also the drive letter assigned for the logical volume used as install target on your USB disk.
- Point to the lower left Windows 8 desktop corner, till the Start popup window hovers – and press the right mouse button.
- Click to the context menu entry command window (administrator).
- Enter the commands shown below into the command prompt window.
Here is the command to write the install files from install DVD to the USB drive:
imagex.exe /apply d:\sources\install.wim 1 g:\
Imagex transfers the content of install.wim located in sources of the install DVD to the target drive. The command above assumes, that D:\ is the DVD drive with the Install-DVD. And the install files are located in folder \sources. Drive letter g:\ stands here for the target drive. Take care, that this drive letters could be different in your environment.
In a 2nd step write the boot files (bootmgr, BCD) to a partition on USB disk. I used the following command:
bcdboot.exe g:\windows /s g: /f ALL
Drive letter g: and \Windows represents the Windows drive on my USB disk. The 2nd drive letter (here I used g: for instance) represents the drive on the target USB disk, that should be used for the boot files. If you use a partition "system reserved" you need to assign a drive letter to this partition first (use disk management for this purpose). Then use the drive letter of this system partition behind option /s. The command above writes all boot files from Windows-Folder to the USB drive.
Repair and modify boot entries
Because I often failed to write all boot entries in a proper manner, I developed a few hints, how to repair and modify boot entries on a USB disk.
- Boot your Windows 8 Consumer Preview (the already installed version, not the To Go install). Windows 7 isn't sufficient, because the boot loader is different.
- Launch an already installed EasyBCD or Visual BCD, load the boot files from USB disk and modify the boot menu entries.
Using EasyBCD is discussed here here for Developer Preview. You can use the same steps in Consumer Preview. If the drive isn't visible, launch computer management, go to disk management, select the system partition and assign a drive letter.
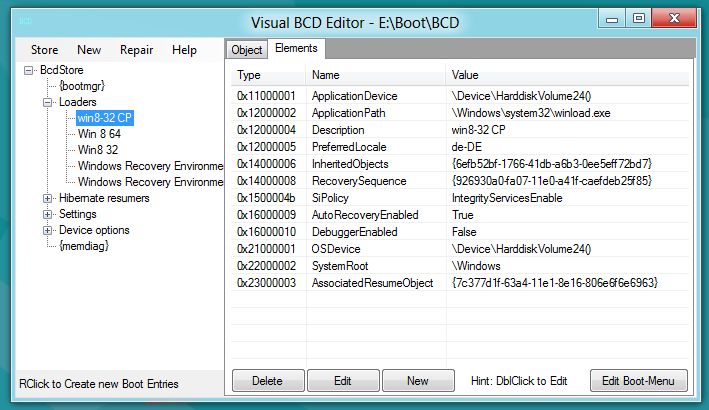
The screen shot above shows BCD from my USB hard disk in Visual BCD Editor. Use Open store in menu Store to access BCD store of a disk. The the dialog box shown allows to navigate to partition "system reverved" and select file BCD in folder Boot.

The file BCD will be visible only, if a drive letter is assigned to the partition and if show hidden system files is enabled in windows explorer options. The options are accessible through View tab Options button windows explorer in ribbon.
Windows To Go – Consumer Preview on the run …
After creating the To Go install, you should boot a system from the USB disk. During first boot the system is configured. One of the setup pages ask for product key, but there is a button to skip that entry. Below are some photos of my 10 inch netbook, using a USB 2.0 disk with Windows 8 CP To Go.

Selecting boot device in BIOS menu

Boot entry in Windows boot menu

First screen with Betta-Fish

Voila, the coral lock screen after configuring system

Finally I got the Desktop
The system boots a bit slow, but is useable afterward. A fast USB 3.0 disk shall be better. I tested a MSI Wind U100 netbook and a Dell Inspiron One 2330 with Windows 8 CP To Go. On MSI Wind I have had trouble with keyboard layout. All keys mapped to Fn-Key didn't work well (returning only on character or number, assigned with the FN key). This bug wasn't present in Developer Preview. Also Consumer Preview doesn't allow Metro apps with a desktop resolution of 1024 x 600 pixel. In Developer Preview I was able to run also metro apps on this machine.
Similar articles:
a: Windows 8 To Go with Dual-Boot
b: How to create your own Windows 8 To Go Developer Preview
c: Creating Windows 8 To Go on a 16 GB USB-Stick
d: Windows 8 Consumer Preview – hurray, the start menu is back!


ArsTechnica has now also an article, explaining how to create Win To Go step by step [see].
But take note: Windows 8 To Go comes with a few restrictions and bugs (some I haven't seen in DP). According to comments in the German edition of this article, Refresh and Repair are not supported.
Hello, do you have a way to create a Windows To Go drive able to boot on a MacBook? I've sow that the official usb drive created by Microsoft runs well on macbook but i've created one using your tutorial that works well on a acer but im not able to boot on macbook. Thank you.
Anexandru: answered at